Tuesday, 4 August 2020

The Redwood Tote from Noodlehead

In my Bigger Box of Fabulous for July was a bag pattern for the Redwood Tote by Noodlehead, and this is my make. I have used the fabrics which were in the subscription box, Midnight Garden from Dashwood Studio. These are a cotton and linen mix and are a great fabric for this style of bag, two zips and some bag hardware complete the project.


If you received July's Subscription Box with this pattern I have a few hints and tips for you! Or if you would like to try making this bag you can purchase the pattern here on my website.

The fabric suggested on the pattern is based on 112cm wide fabric, the fabric I chose for the bag is 147cm wide. I cut all my exterior bag pieces including the base, handles and strap out of the rain cloud print, the piece I used was 50cm in length, and I used the stripe for the lining which was 60cm. With careful planning and measuring, I was able to fit the relevant pieces onto the different fabrics. There aren't any pattern pieces to cut and lay out, everything is cut with a ruler and rotary cutter or scissors, there is a suggested layout in the instructions.

The zips which were included were from zipping by the metre, I always use this kind of zipping, generally a #5 so I can cut it to whatever size I need. I allow a bit more then cut off the excess. Sometimes you need to put the zip pull onto the tape and I use the kitchen fork method! Below is a video showing how to do this, it's in German but it is only 1 minute long and visually very easy to follow.


The video below shows how to shorten a zip to the length you need. You could also sew some stitches the other end of the zip as well which would be the top of your zip. As the end of the zip will be enclosed in the fabric I don't usually do this but if you are worried about the pull coming off while you are working with it then go ahead. This method can only be used for nylon/plastic zips as metal ones are much more difficult to shorten!


Here is Hazel modelling the bag so you can get a better idea of the size.


This is the lining of the bag which has a double slip pocket sewn onto it.
It's a fairly straightforward bag to make and if you are using directional fabric make sure you cut all the pieces out the same way, and sew together facing the same way, ask me how I know!


Happy sewing!

Saturday, 18 July 2020

Fifties Fabulous Frame Bag

Introducing the Fabulous Fifties Frame Bag, designed by Hazel Adam!
The project card which was featured in June's Little Box of Fabulous was for this bag and it's gorgeous! I used fabric from my stash, Cat-i-tude from Benartex and the purple spot from Makower.
The frame has holes in it so Hazel suggested sewing it onto the bag using delica beads as a decoration. As I didn't have delica beads in the right colour I used seed beads.


This is such a beautiful design, I can see it being used on many occasions! There is a pocket inside which fits a bank card and plenty of room for your makeup and other essentials!


I found the pattern easy to follow and a quick sew. Make more than one and give as fabulous gifts!


I know have kits listed on the website in two colourways, with more to follow. Find them here.


Happy sewing!


Saturday, 4 July 2020

The Sassy Saddlebag

Wow! Where did June go?! Can't believe that we are in July, and today it's raining! It was my parents 60th Wedding Anniversary on the 25th June so I spent most of June doing a cross stitch as part of their present. When I was looking through photos for this post I realised I hadn't taken a photo of the completed cross stitch, so here is an almost finished pic!


June's Bigger Box of Fabulous which shipped to subscribers early July, contained a bag pattern from Mrs H, The Sassy Saddlebag. My mid year resolution 😍 is to make up the patterns and project cards which go into the boxes before they are posted! Fingers crossed! This is my version, the small size. I decided not to put the flap border on and I used chicago screws instead of rivets on the straps, I find these so much easier to use as you just make a hole in the fabric and screw the two halves together. 

I cut all the outer pieces including the strap, from a half metre of fabric. What I love about this pattern is that you can make it your own by cutting the pieces out of various fabrics, or out of one design as I have.


Here is the finished bag!


If you would like to make this bag you can find the full size paper pattern available on my website, here.


Happy sewing!

Friday, 29 May 2020

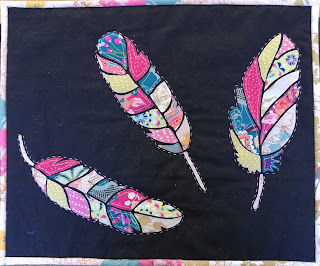
Feathers Mini Quilt

As I had a bit of spare time on my hands this week I thought I would make a mini quilt! I've made a few over time which are hanging already but I have a large expanse of wall in my living room which is just crying to be covered with pretty makes. I've ordered some mini pegs so I can hang them easily using Command hanging strips so as not to mark the walls.

If you've been following my Blog you will have seen that most of my makes have been made from fabrics I sell in my shop Sew Fabulous Fabrics so I have lots of scraps which were just waiting to be made into a new project.

After doing a bit of blog hopping I came across this free tutorial for a Feathers Mini Quilt on the Down Grapevine Lane blog. I decided not to put a border around mine as I wanted it to be a quick finish with minimal quilting which I did by hand. I also decided to place the feathers at different angles for a bit of interest, and I love how the hand quilting makes the feathers 'pop' off the background.


Hopefully it won't be too long before I can show some pictures of my new inspiration wall!

Happy sewing!


Thursday, 21 May 2020

Dutch Rose Block Pattern

I recently put together a bundle of fabrics which I thought would look lovely as a quilt or just to make a block! I'm not a quilter by any means, I have made a few quilts over the years and given them to family and friends, but as I have been going through all my photos I haven't really documented them very well!
In 2013 I left my job and went travelling for 3 months. Of course wherever I went I had to find fabric shops! Whilst in Australia I picked up a quilt pattern from a quilt shop which I made up for my Mum when I got home. Unfortunately the photo's aren't brilliant and I'm sure I still have the pattern somewhere, but at this moment it's in hiding! 😊 This pattern really appealed to me as there is hand stitching involved too, I must try and locate it so I can make it again!


At the time I wanted to sew items to sell at craft fairs and decided to use two of my nieces middle names, Indigo and Belle for the name. I hadn't realised that my sister-in-law had also been using this name so I changed it to Indigograce Designs when I opened my Etsy shop. So I think my Mum's quilt is the only one with this one on the label!


So to present day. As my business is relatively new and building I still have some time to be creative. Patchwork and quilting has always inspired me so having a variety of fabrics in my shop has led me to putting a bundle of half metre cuts together which would be great made into a quilt. I found a block for the Dutch Rose on the Quilting Daily website and made it up, which I am just going to bind to make as a mini wall hanging.


And here is the block!


 Happy sewing!


Thursday, 14 May 2020

The Roundabout Bag from So Sew Easy

I love the shape of this bag! I've never sewn a round bag before so I was expecting it to be a bit of a challenge! I used the Mystical Land range of fabrics from Art Gallery Fabrics which went into the Boxes of Fabulous for April. I absolutely adore this range and so pleased I bought it. The original fabrics I had bought to go in the subscription boxes are at Hazel's house so I had to choose some more! Such a hardship!! 😄


For the main body of the bag and cross-body strap I used the Shrub Charm Sage which is much greener IRL than in the picture! And the Magic Fauna Mirage for the pocket on the front and on the back. I included a magnetic snap to close the front pocket. For the lining I used Elixir Paeonia.


I decided to make a cross-body strap rather than the over-the-shoulder strap as this is more my preference. You can purchase the pattern from So Sew Easy on Bluprint here.


Wednesday, 6 May 2020

The Runaround Bag from Noodlehead


Meet the Runaround Bag from Noodlehead! This is the pattern which went into the Bigger Box of Fabulous for April. For the outer I used the Multi Birds from the Flock range by Dashwood Studio, the lining and binding is unknown as it's from my stash! 


I haven't made any bags for a little while and I really enjoyed making this one. Because the bag has bias binding around the handle I decided to make my own. I have had a bias tape maker for ever, and never really got the hang of using it, I was always too many fingers and thumbs! But recently I came across a video tutorial of using hair straighteners rather than an iron, luckily I have a pair, and I found this method was so much easier for me!


The bag is quite roomy and has a zipped pocket and slip pocket inside, I chose to put both in mine. It closes with a magnetic snap and sits nicely on the shoulder. Because the handle is not too long it could also be used as a grocery bag.

Happy Sewing!