Monday, 2 August 2021

How to sew a bag strap with cotton fabric and webbing

My last Bigger Box of Fabulous should have contained webbing suitable to make sturdy handles for the bag pattern. Unfortunately I was unable to find anything suitable so I suggested to my subscribers that they could use some of the fabric in the box and the thinner webbing I had managed to obtain. I decided to make a video of the process, which you can find below. It's not the best video 😁 my skills are not brilliant and I don't really like talking on them! But if you can excuse my video inadequacies then it may help a bit! I have also included a few photos of the process under the video.

How to make a bag handle


Instructions to make a bag strap:

Cut your cotton fabric 2" wide by desired length of strap including seam allowance. Cut the webbing 2" shorter than the fabric. Interface the fabric if you want a sturdier handle, I did this for mine.


Fold the fabric in half lengthwise and wrong sides together, either finger press or press with an iron to form a crease. Unfold and fold each edge into the middle. This will make the strap 1" wide when finished.


Keeping the strap folded so it is 1" wide sew the webbing to the right side of the fabric ( not the folded in side) at one end using a 1/4" seam, then repeat the other side. Once you have turned the strap around the right way so the webbing is now flush to the underside of the strap, you will notice that the fabric overlaps at the back by approx 1/2" on each end. Top stitch the webbing to the strap using a longer stitch length than normal, I used a 3.5. As there is not so much bulk at the ends you will find it easier to sew.


Ta dah! Your strap is now finished and ready to adorn any of your handmade bags!


Happy sewing!


Saturday, 10 April 2021

All-In-One Box Pouch


Have you been able to get any sewing in recently? Each month I try to make up either the project card from Hazel A Patterns, which is featured in the Little Box of Fabulous, or the pattern which goes into the Bigger Box of Fabulous.

Last month I was able to make the All-In-One Box Pouch from Aneela Hoey which had been in the Bigger Box of Fabulous for March.


This is a really neat size which would be ideal to take to workshops and classes, when we're able to! For my project I used fabrics from Art Gallery, Dashwood and Lewis and Irene, they are all available on my website.


I love the frogs peeping out in the lining, ready to hop out!


The zipped pouch attached to the front has two separate zipped compartments with clear vinyl so you can see the contents.


The pattern is available to purchase in my shop.

Happy sewing!

Vicky


Monday, 15 March 2021

Auditioning Fabrics and Learning EQ8

This is the first post about my experience using Electric Quilt 8 to design a block of the month (BOM) quilt. There is so much to this program it's going to take a long time for me to get used to it, but sometimes you just have to go in head first!

I won't bore you with all the details but this first block I had designed in PreQuilt but the program has limitations especially as I want it to be a Foundation Paper Pieced (FPP) block. When I had finished designing the basic shape I realised that it wasn't centered in the 12" block I wanted it to fit in! But that's ok, as at this stage I'm playing with the design to see what works. I then had to decide which lines became extension lines to the edge of the block which is what makes it a FPP pattern.


Looking at the design again I think I could limit the amount of background pieces, once I make a start hopefully it will become clear!

I then put some colour into the block and kept the background white. The program has a huge library of plain and printed designs in every colour imaginable and an extensive collection of fabric swatches from some of the leading cotton manufacturers.


There is also the ability to import images of the fabrics you are planning to use in your quilt to see how the finished project would look. This is next on my 'to do' list as I really would like to see if the fabrics I've chosen will work. Unfortunately I haven't any white/cream for the background so I will be trying a coloured print instead. Below is my fabric pull but it could all change once I see them in the block!


Next time we'll have a look at the block with my chosen fabrics and whether I've made any changes.

Happy sewing!
Vicky


Monday, 8 March 2021

New program to learn!

Follow my blog with Bloglovin

The past 18 months have been a huge learning curve for me as I started my fabric business in 2019. Setting up and designing my own website, starting business Facebook, Instagram and Pinterest pages, learning EVERYTHING to do with Google analytics, My Business and Google ads, with loads of help from Hazel A Patterns (check out her new website!!), this blog and working on a business plan, it's been a lot, but extremely enjoyable and rewarding!

So this leads me to the subject of this post. I've recently been considering expanding my products in my online shop to offer a Block of The Month quilt program. But first I need to design the quilt! 
I've recently learnt Foundation Paper Piecing which I absolutely love! This was my first attempt.

Some of the piecing isn't that accurate, but hey starting a new hobby is always a learning curve! After extensive searching on the web I found two sites which I thought I could start with to learn the process of designing, Prequilt and Quilt Assistant. I'm particularly interested in using FPP, applique and hand embroidery in my design. Not too much to consider!

These are 4 blocks I designed in Prequilt to see what it does and doesn't do. 


I enjoyed creating them but you can't transfer them into FPP patterns using this program so I found Quilt Assistant to help me do that. It's a very old program from 2009 but it's free and a fabulous way to start out.

The block below is the first block above with suggested FPP order which I numbered. You can print each section out which I did but a lot of the points weren't accurate, but it was great to see it in print.


So where am I at now?! I loved designing this so much that I've just invested in Electric Quilt 8 to enable me to design! I will be documenting my learning process on my blog, so if you want to see how I get on then sign up for my blog alerts.

Happy sewing!
Vicky


Sunday, 7 March 2021

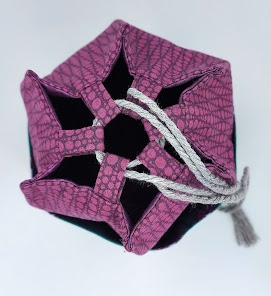
My Hexi-Caddy

It's been a while since I shared a Lookbook from Art Gallery Fabrics. This showcases one of their recent new ranges, Little Forester Fusion, which you can find in my shop here. These were in the Little Box of Fabulous in February. I have five designs from the range and I love them all! 😊


The project card which was in last month's Little Box of Fabulous was for a Hexi-Caddy designed by Hazel A Patterns, and here is mine!


I used fabrics from my stash, and I absolutely love it! The design is very clever with a star shape forming when you pull the cords to close it. With the pockets around the outside there is plenty of storage. If you lined it with waterproof fabric it would make a lovely wash bag or fill it with lovely smellies for a fabulous Mother's Day present! If you would like to make one for yourself then you can download it here, with 20% off until Friday 12th March, use the code HEXICADDY at checkout.


Happy sewing!
Vicky


Thursday, 4 February 2021

Hazel A Patterns takes over the blog!

Today Hazel from Hazel A Patterns is taking over the blog to talk about her latest pattern for Sew Fabulous Fabrics.

Use code STRIPEYTOTE to receive 20% off the PDF in my Payhip store.


My patterns are usually for smaller items, but in my everyday life I love sewing garments, and I love sewing bags. I don’t make a lot of bags, as they usually use a lot of hardware and internal structure, but I have been thinking for a while about how I could create a bag pattern that would use minimal extras, and that additionally could be made using the fabric supplied in Vicky’s Little Box of Fabulous. Welcome to the Soft Stripey Bucket Tote!


The first challenge in designing this pattern was how to get a big bag out of just fat quarters. Stripes are the obvious answer, and also mean that this bag can be used as a stash buster too. My first prototype even uses co-ordinating fat quarters for the lining! (I have a lot of gorgeous fat quarters, but not many half metres). Top-stitching strengthens the seams too, as does the extra stitching on the bottom hem of the lining.

The second challenge was the structure of the bag. I wanted this pattern to be something that wouldn’t need a lot of additional materials, but that could be made with quilt-weight cotton. The solution is one I resort to a lot – fusible interfacing! I buy mine 5 metres at a time, as I love how it really changes the handle of lighter weight fabrics. I use a soft medium weight for most of my projects, heavier than I would use for dressmaking, but still with a nice drape. I also used one of my other favourite products to create the shape at the top of this bag: Decovil Light. Just a narrow piece at the top of the bag is enough to create the curved shape, and has the added bonus of making the top less likely to flop over when you are filling the bag one-handed in the supermarket!


Finally, I just wanted to chat about the handles. This pattern uses a heavy webbing, which is naturally really strong, especially when stitched and top-stitched. The method I have used to create the handles makes the webbing curve outwards slightly. I really like this as it tilts the handle so that it sits facing forwards, making it sit nicely over a thick coat or jumper. I thought it would be nice to show an alternative method of positioning the webbing to make straighter handles, so here we go!

Follow this version of Step 2:

Working with the wrong sides out, find the centre top edges of each outer and mark. Your straps will be 5 ½” apart, so measure out 2 ¾” either side of your centre mark, and mark again. Take your first strap and position it to the left of the left-hand mark, with the raw edge approximately ½” below the top of the Decovil. Mark a line on the webbing that matches the shape of the decovil underneath it. Repeat with the right-hand side of the strap. Now turn your outer over so that you are working on the right side of your outer.


Reverse your webbing so that the raw edges are above the top of the Decovil (you should be able to feel it through the fabric), and match your drawn lines to the top of the Decovil. The webbing will now be at an angle, sloping inwards. Pin it below the Decovil, to keep it in position. 


Repeat for the other outer, then stitch in place at 1/8” above the Decovil.


Happy sewing! Check out my Instagram for extra photos and videos
😊

Wednesday, 3 February 2021

Review of the Sandhill Sling Bag from Noodlehead


Noodlehead recently released two new bag patterns one being the Sandhill Sling Bag. As I am a bag maker and was on the look out for a new bag to make for myself I thought this would be a great pattern to go into the Bigger Box of Fabulous for January. 


The fabric suggestion is for canvas but I had recently received a delivery of an imitation leather from Modelo Fabrics in a pearlised grey. It has a woven back and is gloriously soft with a dimpled effect, and really easy to sew.
The pattern suggests using a cotton webbing for the strap but also gives cutting instructions for a fabric strap which I decided to do. I used the imitation leather with gun metal hardware along with gunmetal zips and tear drop zip pulls.
I decided to iron on some medium weight interfacing to the back of the fabric to give it a bit more stability, because it has a woven back this is easy to apply. If you wanted to give the bag a bit more structure you could apply a thin foam, or interface the lining fabric as well. There is a slip pocket inside but you could easily change it to a zipped pocket.
I would suggest using stitch length no. 3 for sewing the imitation leather and 3.5 for topstitching. I found it ok to sew with a normal sewing foot but if you are worried about it sticking when topstitching you could use a walking foot or a non-stick foot. You could use a Leather needle 90/14 for sewing but I used a Universal needle which was fine.


This is the box which went out to subscribers for January's Bigger Box of Fabulous. Along with the imitation leather there were two pieces of fabric from a new range for Art Gallery Fabrics, Aquarelle designed by Katerina Roccella, which you can find listed in my shop. Two zips, one with two zipper pulls for the opening of the bag and one for the front pocket, Scanfil All Purpose sewing thread, a bag slider, d-ring and swivel clip all in gun metal.


Check out the video for a closer look at what was inside the box!


Happy sewing!